The first article in a series on echo basics in veterinary patients, aimed at the general practitioner vet getting started with echo. Hope it is helpful. However, echo is a practical skill, so please consider attending an in-person teaching course somewhere near you to develop your skills.
Getting started with echo can be very challenging.
- There’s a lot of practical considerations, in terms of using an ultrasound machine optimally, and understanding them.
- Then you need to familiarise with the image acquisition and terminology
- Then you need to optimise and measure the images.
- Finally you need to interpret and report your findings.
Today we’re jumping in on the second part, because this is the starting point for most vets. Turn the machine on and have a go with the default settings. Or get someone else to help with set up. Learn by doing!
However - never neglect your knowledge of your own ultrasound machine, as subject you should keep learning about as you gain other skills.
Preparation
We always clip a window of hair behind the elbow, and apply some surgical spirit as a degreasing agent. Then use just a pea sized blob of ultrasound gel, applied to the probe head.
Get an echo table with comfy padding and a cutout in the edge to allow for scanning from underneath:

Top recommendation in the UK: Heartvet's Echo Table
Then place the dog with head to the left and legs towards you, with the right side downwards:

Scanning
The scanner has a fan of ultrasound coming out of the end:
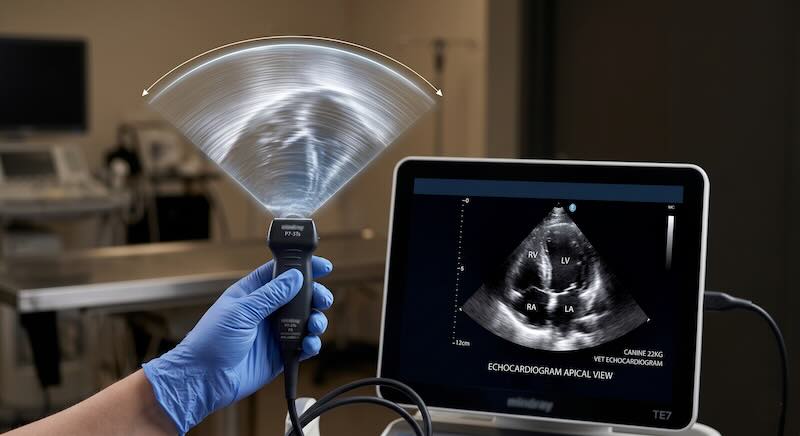
Keep this in mind. You need an understanding of how this 2D fan of ultrasound is coming out of the probe, and how to line it up on the heart in different ways to get the views.
There is a marker or light on each ultrasound probe for orientation. Usually you place your fore-finger on the marker and your thumb on the other side:

Top tip: Make sure you have the ultrasound machine set to show the marker on the right side of the screen, and the fan of ultrasound coming from top to bottom, to keep the images the right way round on screen. Note this is different from abdominal imaging, where the tradition is to put the marker on the left of the screen. Here on a GE machine it is a little yellow ‘v’:

This letter 'v' corresponds with the marker on the probe, so you always know the orientation of the ultrasound beam as you move and rotate the probe.
Orientation
Understanding the dog’s heart positioning is crucial. Echo is full of confusing terms, but let’s break them down.
Start by imagining a dog lying down ready for a scan. The heart sits in the chest of course, like this:

Here you can see the same thing on a lateral chest x-ray, showing how the heart sits at an angle inside the thorax:

So the long axis of the heart is positioned not straight up and down, but on a line running from the cervical spine to the sternum, and the short axis is at 90 degrees, running from the elbow to the tail:

The right parasternal long-axis window: The heart homepage
We scan in a ‘window’, which is shown here and known as the ‘right parastenal window’.

The right parasternal window is the anatomical “homepage” of the veterinary echocardiogram. It is accessed by placing the probe between the fourth and sixth intercostal spaces on the right side of the chest, where the apex beat is most palpable. In this window, the heart is oriented fairly horizontally, ensuring that the major chambers and walls are perpendicular to the ultrasound beam—the ideal configuration for anatomical measurements.
We use the 2 axes shown above to describe the 2 main types of views. So we get: Right Parasternal Long Axis (RPLA) views, and Right Parasternal Short Axis (RPSA) views. Both slice the heart completely differently, and have multiple variations.
The long-axis four-chamber view
The RPS long-axis four-chamber view is obtained by pointing the transducer marker towards the patient’s head or cervical vertebrae, which should be your forefinger if holding the probe as described above.
Point the probe straight upwards as you are scanning from underneath the dog. You are aiming for the fan of ultrasound to be lining up with the imaging plane ‘1’ as shown here:

Checklist:
- Finger on marker
- Marker towards cervical spine
- Probe pointing up
- Find an intercostal space in the parasternal window, and press gently.
Four chamber view:
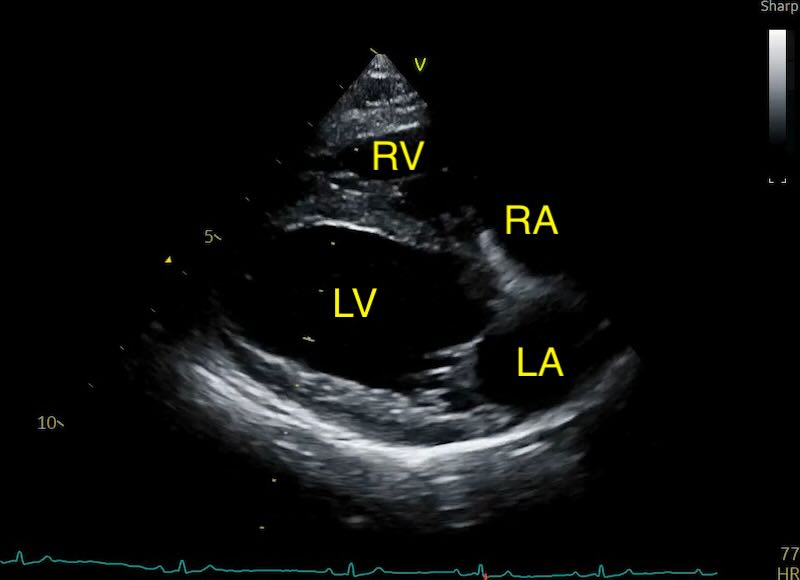
This “homepage” view is the perfect starting point, as it allows for an immediate subjective assessment of global heart size and function.
What to look for:
Chambers:
The sonographer should look for the relative proportions of the chambers. In a normal heart, the right ventricle should be approximately one-third to one-half the size of the left ventricle.
The left atrium is situated on the right side of the screen (if you set up your markers correctly) and forms approximately one-third of the total length of the cardiac silhouette in this plane. The interatrial septum should appear as a thin, horizontal line between the two atria.
A persistent bowing of the interatrial septum into the right atrium is a hallmark of raised left-sided filling pressures, often preceding overt clinical signs of failure. Its a good sign the dog is in stage B2 or later, if staging for mitral valve disease.
Valves:
This view is also primary for the evaluation of the atrioventricular valves. The mitral valve leaflets should be thin and mobile, opening widely during diastole and meeting at a clear “line of apposition” during systole. Watch for valve prolapse - the bowing of the leaflets into the atrium during systole - or even “flail” leaflets, where a ruptured chordae tendineae allows a portion of the valve to whip freely into the atrial cavity.
The long-axis five-chamber (outflow) view
By slightly rotating the probe cranially the left ventricular outflow tract (LVOT) and aortic valve come into view, creating the “five-chamber” view. You are aiming for the fan of ultrasound to be lining up with the imaging plane ‘2’ as shown here:
This view maps the interventricular septum as it transitions smoothly into the anterior wall of the aorta.
This plane is essential for identifying abnormalities in the aortic valve, such as subaortic stenosis (SAS), which appears as a hyperechoic ring or ridge just below the aortic valve, and degenerative disease. The aortic valve should open cleanly against the walls of the aorta during systole and close centrally during diastole. In cats it often shows the classic LVOT obstruction and turbulence associated with hypertrophic obstructive cardiomyopathy - the commonest cause of a murmur in cats.

The right parasternal short-axis ladder: Slicing the silhouette
Rotating the transducer 90 degrees clockwise from the long-axis plane moves the sonographic slice into the transverse or “short-axis” orientation. AKA ‘thumb to bum’, because that’s where your thumb should now be pointing.
You don’t need to move the probe head’s location at all - just rotate it.
Extra tip: for comfort’s sake, get used to moving your hand round a bit on the probe after the rotation to a more comfortable orientation, or you risk wrist strain.
You can now see multiple different heart slices, depending on how you angle the probe. A gentle ‘fanning’ movement is all that is needed. This transition is described as “walking up the ladder” of the heart, moving from the solid muscular apex to the base where the many circular “pipes” (the great vessels) are located.

- Bull’s Eye View (The Apex)
- Mushroom View (The Papillary Muscles)
- Fishmouth View (The Mitral Valve)
- Mercedes-Benz or Whale View (The Heart Base)
Level 1: The Apex (The Bull’s Eye)
At the most ventral point of the “ladder,” the ultrasound beam passes through the very tip of the left ventricle. In this slice, the left ventricle should appear as a thick, solid ring of muscle. The right ventricle is generally not visible at this level in a normal animal. This view is clinically significant for the detection of pericardial effusion; because the dependent lung is pushed aside and the heart is closest to the probe, even small amounts of fluid will be visible as an anechoic (black) space circling the apex—the “Bull’s Eye” sign.
Normal:

Pericardial effusion:


Level 2: The Papillary Muscles (The Mushroom View)
As you tilt the probe slightly towards the heart base, the slice moves into the mid-ventricular region. This is usually the exact ‘vertical position’ of the probe.
Two prominent muscular structures, the anterolateral and posteromedial papillary muscles, appear within the circular left ventricle at approximately the 4 and 8 o’clock positions. This creates the characteristic “Mushroom” appearance. The right ventricle is visible at the top of the screen as a thin, crescent-shaped chamber.


This is the standard level for quantifying ventricular size and function. You must ensure the left ventricle is circular; an oval or “egg-shaped” appearance indicates the probe is “off-axis,” cutting the ventricle at an oblique angle which will lead to an overestimation of wall thickness and chamber size.
Optimisation Tip: Look at the papillary muscles either side of the mushroom stalk, and gently rotate the probe one way and the other until they are equal.
The primary metric here is the Normalized Left Ventricular Internal Dimension in diastole (LVIDdn). Teaching is usually focused on getting an M-mode and measuring the diameter from there, but we’ll look more at that later.
The normalisation formula is:
LVIDdn = LVIDd (cm) Weight (kg)0.294
But don’t forget to make use of our echo calculator. An LVIDdn > 1.7 in a dog is a major clinical trigger for identifying Stage B2 mitral valve disease, indicating that the heart has begun to remodel in response to volume overload.
Level 3: The Mitral Valve (The Fishmouth View)
Tilting the probe further towards the base, the papillary muscles disappear and are replaced by the thin, hyperechoic leaflets of the mitral valve. As you go through the views, you should find you are ‘lifting’ your wrist, starting to lift the probe cable up slightly. The movements are tiny though!
During the cardiac cycle, the leaflets open widely in two distinct phases (early diastole and late atrial contraction), resembling the mouth of a fish. This is one that really needs to be seen moving to understand the reference though!


This view is used to evaluate the thickness of the valve leaflets and to measure the E-point septal separation (EPSS) via M-mode. An increased EPSS (where the anterior leaflet fails to come close to the septum) is a sensitive indicator of reduced systolic function or significant ventricular dilation.
Level 4: The Heart Base (The Mercedes-Benz or Whale View)
The most basilar rung of the “ladder” captures the aortic valve in cross-section. At this point your lift has lifted quite far, and you often need a small extra clockwise rotation as the imaging plane for this view is slightly different (see the diagram above).
During diastole, the three cusps (right coronary, left coronary, and non-coronary) meet at central commissures, forming an inverted “Y” shape known as the “Mercedes-Benz” sign. The left atrium is situated immediately behind (below on the screen) the aorta, and looks like a whale.


The Mercedes-Benz view is the target for the LA:Ao ratio - see next article. The right ventricle is seen wrapping around the aorta cranially (from 10 to 2 o’clock), containing the tricuspid valve, the right ventricular outflow tract (RVOT), and the pulmonic valve (PV). The interatrial septum is visible between the right and left atria (7 to 10 o’clock).

Level 5: The Pulmonic Outflow (The Bifurcation View)
By tilting the transducer even more cranially towards the patient’s head from the Mercedes-Benz view, the sonographer reaches the highest rung of the ladder.

In this plane, the aorta remains a central circle, but usually you start to lose the Mercedes-benz sign of the 3 separate valve cusps. Now the right ventricular outflow tract (RVOT), the pulmonary valve (PV) and the main pulmonary artery (PA) become the focus. But you can also often see the right atrium (RA) and tricuspid valve (TV) nicely in this view.

This view is essential for documenting the bifurcation of the main pulmonary artery into the right and left branches. In a normal dog, the aorta and pulmonary artery should be of similar diameter. A pulmonary artery that is wider than the aorta is a significant finding that may indicate pulmonary hypertension or a left-to-right shunt.This view is also the primary site for identifying a Patent Ductus Arteriosus (PDA) using Color Doppler, which typically appears as a high-velocity “flame” jet entering the pulmonary artery near the bifurcation. And an abnormal pulmonic valve is also visible in this view, seen with pulmonic stenosis.
Summary table:
| Short-Axis Level | Defining Landmark | Clinical Focus |
|---|---|---|
| Apex | Solid muscular ring | Detection of pericardial effusion ("Bull's Eye" sign). |
| Papillary Muscles | Two muscles ("Mushroom" view) | Quantification of ventricular size and function: LVIDd, LVIDs, FS, and LVIDdn. |
| Mitral Valve | Opening leaflets ("Fishmouth" view) | Evaluation of valve thickness and systolic function via EPSS. |
| Heart Base | Aortic cusps ("Mercedes-Benz" sign) | Primary level for LA:Ao ratio measurement and assessment of the RVOT. |
| Pulmonic Outflow | Artery bifurcation ("Whale" view) | Screening for pulmonary hypertension, pulmonic stenosis, and PDA. |